Sunday 19 August 2018

How to Import iTunes Library to New Computer

Import iTunes Library to New Computer

How to Import iTunes Library to New Computer


Most people have quite large iTunes libraries, and it might be a little bit difficult to import iTunes library from one computer to another.


For me, however, the main drawback of a new computer is that you need to configure everything from scratch. This is the fun. Part of it is fun, but it can be stressful and long-lasting. For example, migrating your iTunes library to a new computer. There is nothing fun, and if you have a large library, it could take hours.


There are some important techniques you can use for that. This article contains details of each option. The below article provides a step-by-step guide on how to import iTunes library.


Method 1: Transfer iTunes Library to New Computer Using External Hard Drive


Method 2: Transfer iTunes Library to New Computer Using Migration Assistant (Mac Only)


Method 3: Transfer iTunes Library to New Computer Using iMyFone TunesMate
Method 1: Transfer iTunes Library to New Computer Using External Hard Drive


External hard drives offer more storage capacity at lower costs than ever before. In appreciation to this, you can get a very extensive external hard drive at an affordable price. This is another easy way to move your iTunes library to a new computer, especially if your library is larger than the storage capacity of your iPod. To transfer iTunes library to a new computer using this method, you need an external hard drive with enough storage space for your iTunes library.


Step 1.Locate iTunes library on your computer.


MAC - Users > Username > Music > iTunes > iTunes Library.itl


Windows Vista or later – C:\Users > Username > Music > iTunes > iTunes Library.itl


Windows XP – C:\Documents and Settings > Username > My Documents > My Music > iTunes > iTunes Library.itl


Step 2.Plug your external hard drive into your old computer, and copy and paste iTunes Library. Itl file into external hard disk drive.You may also like:how to format laptop


Step 3.Detach the external hard drive from the first computer. Then connect the external hard drive to the new computer where you want to transfer the iTunes library to.


Step 4.Transfer iTunes Backup from the external drive to the new computer.You may also like:how to use move to ios


Depending on the size of your iTunes library and the speed of the external hard drive, it may take some time to import iTunes library from your external hard drive to new computer.
Method 2: Transfer iTunes Library to New Computer Using Migration Assistant (Mac Only)

On Mac, the easiest way to transfer iTunes library to a new computer is to use the Migration Assistant Help Tool. This can be used when setting up a new computer or after it is already done. The migration wizard tries to create your older computer in a new one by moving data, settings, and other files. Not 100% perfect but most files are transferred very well and it will save you a lot of time.

The Mac OS Setup Wizard offers you this option when setting up a new computer. If you do not select it, use it later by locating the Migration Wizard in the Applications folder inside the Utilities folder.

Step 1.Connect both computers with a Firewire or Thunderbolt cable (depending on your Mac).

Step 2.Restart your old computer and hold down the "T" key. You will see it restart and display the Firewire or Thunderbolt icon on the screen.

Step 3.Start the migration wizard to the new computer and follow the instructions on the screen to import iTunes library (You already know the location of iTunes library in first method).
For now, check:Free iTunes/iPhone Backup Extractor for iPhone, iPad

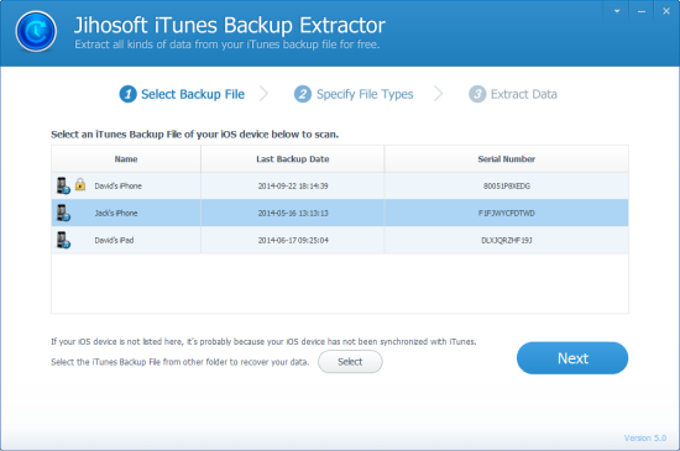
Jihosoft iTunes Backup Extractor Free is a powerful tool to recover and extract important data from iPhone, iPad & iPod touch backup on Windows or Mac.

Why Won’t My iPad Sync to iTunes? Here Are the Solutions


Tip #1 - Update iTunes


The first thing you should try is updating your iTunes to determine where the problem is stemming from. If iTunes has a problem or a bug which has been fixed in a recent update then by updating iTunes, the chances are that the issue will be fixed and you'll be able to sync your iPad afterwards.For now, check:Free iTunes/iPhone Backup Extractor for iPhone, iPad


Jihosoft iTunes Backup Extractor is a powerful tool to recover and extract important data from iPhone, iPad & iPod touch backup on Windows or Mac.


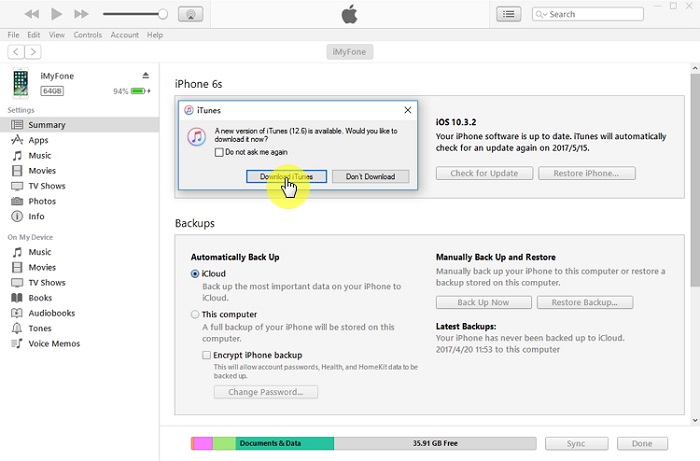
When you first open iTunes, if an update is available then a notification should prompt you to update.


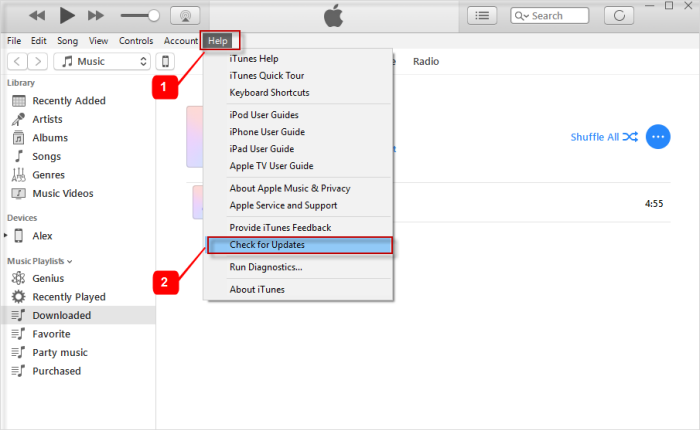
If you don't see this notification, then click on the "Help" tab followed by "Check for Updates". If an update is available, simply download and install it, and your iTunes will be reinstalled with the newer version.


If updating iTunes doesn't work, the problem lies elsewhere (possibly your settings).

Tip #2 - Check Your Sync Settings


The issue might simply be that you haven't chosen to sync the types of data that you want iTunes to sync with your iPad. When you connect your iPad and iTunes is launched, click on the device icon at the top of the program and the summary page will be shown.


Using the left panel, click on one of the data types that you want to have synced (e.g. Music, Movies, Podcats, etc). If the box next to, for example, "Sync Music" hasn't been checked then go ahead and check it now.


From then on, whenever you sync your iPad with iTunes, that data type will be synced.
Tip #3 - Reinstall iTunes


Following on from the first tip that we gave you if an update isn't available then it's a good idea to uninstall and reinstall iTunes on your computer. Doing this will not only install clean versions of the iTunes program files but it will also reset all of your preferences (which is preferred as if there is a problem with the settings file, the problem will be fixed).


To uninstall iTunes on a Windows computer, go to the Control Panel and click on "Uninstall a program". Locate iTunes, click on it, and click the "Uninstall" button at the top of the menu - after a few minutes iTunes will have successfully uninstalled, and you can re-download it from the iTunes download website.

Tip #4 - Use iCloud Instead


Obviously, this won't fix the problem, but by choosing to sync your iPad with iCloud then you don't have to worry about your iPad not syncing to iTunes and you can have better management over your iPad's data.If you can’t sync with iTunes and want to rescue data from a disable iPhone, you could try Gihosoft iPhone Data Recovery. Also feel free to ask questions on the iDevice is disabled error in the comments section below.


You may also like:


How to Rescue iPhone Photos and Videos When Stuck in Recovery Mode


How to Get iMessage on Windows PC


4 Easy Ways to Transfer Photos from iPhone to Computer


Sponsor Ads:


Jihosoft Android Data Recovery: the best Android Data Recovery software for Windows and Mac to recover deleted contacts, messages, photos, videos, WhatsApp and etc from Android devices.


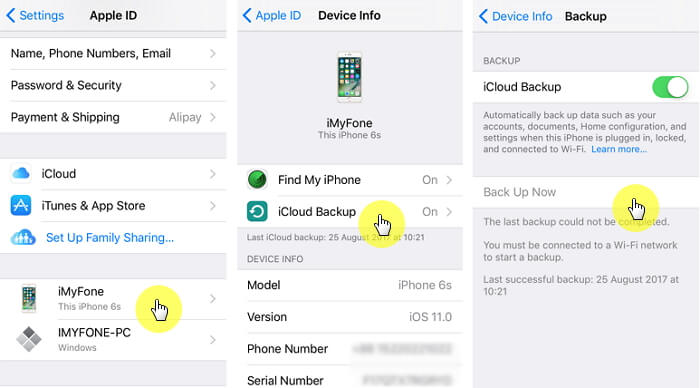
To take an iCloud backup from your iPad, open the "Settings" app and go to "Apple ID > iCloud > iCloud Backup", and tap on "Back Up Now".


After a few minutes, your iPad's data will be backed up but if you have the "iCloud Backup" slider enabled on this menu then your data will automatically be synced with your iCloud account regularly.

What to Do When iPhone Has Bad ESN or Blacklisted IMEI?


What is Bad ESN?

ESN is a unique number for your iPhone that identifies your device. A bad ESN iPhone prevents a device from connecting to the network because of some specific reasons. Those reasons may include not fulfilling the terms and conditions of a network carrier, cancelling the account before making any pending payments, violating any rules of a carrier network, previous owner of the device has reported the iPhone as lost or stolen, etc.


What to Do if you have Bad ESN iPhone?

Following are some of the things you can do if you have bad ESN iPhone:
1. Ask the Seller for a Refund

If you have purchased your iPhone from eBay, Craigslist, or any other online store, then contact the seller and ask for a refund. Most reputed online stores have refund policies, so chances are high that you will get the refund.
2. Get the ESN Cleaned

Many carriers offer services to clean bad ESN iPhone. You can ask your network carrier for help. Alternatively, there are other companies that offer ESN cleaning services as well. You can take advantage of those. Both options will cost you of course.You may also like:online youtube downloader


You may also like:Gihosoft Total Video Converter is a professional all-in-one video tool that enables you to convert videos and audios into various different formats. You can also download videos from YouTube or other online video sharing sites and convert them easily. Plus, you’re able to personalize your videos with its inbuilt editor, such as, trimming, cropping, applying video effects, adding watermark, subtitles, and more. If you need a powerful and professional desktop video converter program, just download Total Video Converter and follow the step-by-step guide here to have a try.
Image result for Bad ESN or Blacklisted IMEI

What is iPhone IMEI Blacklist?

iPhone IMEI blacklist is similar to a bad ESN as the device cannot get access to signals and is forbidden to do so because either the owner of the device didn’t activate it on any carrier or violated the contract/terms of service of a carrier, etc.


What to Do if Your iPhone Has a Blacklisted IMEI?

The solutions to this are similar to the ones described for bad ESN.


You can ask the seller for a refund if the problem occurred shortly after purchasing the iPhone.


Furthermore, you can contact your network carrier and make a request to have your IMEI number cleaned.


And if none of these solutions work, then you can take advantage of online IMEI cleaning services. They will charge you for the service of course, but once the blacklisted IMEI is cleaned, you will be able to use your device without any problems.
For now, check:Free iTunes/iPhone Backup Extractor for iPhone, iPadJihosoft iTunes Backup Extractor is a powerful tool to recover and extract important data from iPhone, iPad & iPod touch backup on Windows or Mac.

Saturday 18 August 2018

Is Music Missing from iPhone?How to Fix ?


Is Music Missing from iPhone?
Possible Issues that May Have Caused ‘Music Missing from iPhone’

If your music is missing from iPhone, you may want to know why the problem is happening. Here are some of them:


iTunes backup errors can erase your iPhone’s music.


iOS update error can cause “Music missing from iPhone”.


If you logged out of iTunes/iCloud account, your music may vanish. Maybe your music was not physical downloaded to your iPhone but was on your iTunes/iCloud account.


You may have physically deleted them without knowing.


You may have turned off the ‘Show all Music” switch in iPhone Settings.


You may have checked the “Sync over Wi-Fi” option. Your iPhone would automatically delete your music files when syncing via Wi-Fi.For now, check:Free iTunes/iPhone Backup Extractor for iPhone, iPad


Jihosoft iTunes Backup Extractor is a powerful tool to recover and extract important data from iPhone, iPad & iPod touch backup on Windows or Mac.


Jihosoft Android Data Recovery: the best Android Data Recovery software for Windows and Mac to recover deleted contacts, messages, photos, videos, WhatsApp and etc from Android devices.


How to Fix “Music Missing from iPhone”

The above possible causes for “Music missing from iPhone” have solutions. So, if you’ve identified one of them as the possible cause of your problem, then you can look up for the solution in the following paragraphs.
Solution #1: Sign in Your Apple ID on iPhone

If you mistakenly signed out your Apple account from your iPhone, your iPhone music may become hidden. This is a default setting that helps to protect iOS data. Hence, you’ll need to sign in to your Apple account using your Apple ID and password.

Step 1: Go to Settings.Gihosoft Free Android Data Recovery can help you easily recover lost data such as photos, videos, contacts, text messages, WhatsApp & Viber chats from Google Pixel/XL or other Android phones effortlessly.

Step 2: Click Sign into your iPhone.

Step 3: Enter your Apple ID and password.

Step 4: If your account is protected with two-factor authentication, then you will need to input your 6-digits code.


Solution #2: Login Your Apple ID to iTunes

If you have more than one Apple ID, you may mistakenly add the one you’ve not used for iTunes account to your iPhone, iPad or iPod touch. If this is the case, the music you synced to iPhone from iTunes may automatically wipe out. You can check to know the Apple ID you are using by checking iTunes and iOS device.


iTunes: Open iTunes and select Store > View Account. Ensure that the email you are using on iTunes matches the one you are using on your iPhone, iPad, or iPod touch.


iDevice: Open Settings > iTunes and App Store. Check the email to see if it matches the one in your iTunes.

If the two emails do not match, you can sign in the Apple ID you used to make the music purchases, then sync your iTunes music to iPhone, iPad or iPod touch.


Solution #3: Restore Your Deleted iPhone Music via iTunes

iTunes saves your purchased music so that it will be possible to recover your iPhone music when you mistakenly delete them or misplace your device. Here is how to restore your iPhone music via iTunes:

Step 1: Open iTunes, and connect your iPhone to your PC using a USB cable.

Step 2: Click Music > Sync Music. Then select the songs you would like to recover to your iPhone, and click Sync.


Solution #4: Restore Your iPhone Music from iCloud

If you purchased your iPhone music with your Apple ID, and iCloud backup is turned on on your iPhone, then you can be able to recover your missing music through these steps.

Step 1: From your iPhone Home screen, launch iTunes Store app, and click “More”.

Step 2: Click “Purchases > Music > Not on This iPhone.

Step 3: Scroll down to find the songs you would like to restore back, and click the download icon on the left side.You may also like:

Gihosoft Total Video Converter is a professional all-in-one video tool that enables you to convert videos and audios into various different formats. You can also download videos from YouTube or other online video sharing sites and convert them easily. Plus, you’re able to personalize your videos with its inbuilt editor, such as, trimming, cropping, applying video effects, adding watermark, subtitles, and more. If you need a powerful and professional desktop video converter program, just download Total Video Converter and follow the step-by-step guide here to have a try.


Thursday 16 August 2018

Top 11 Duplicate Photo Cleaner Apps for Android 2019


Top 11 Duplicate Photo Cleaner Apps for Android 2019

Many photos on your Android device are identical copies of the original one. This compromises phone memory as well as its performance. So why to keep these extra photos when you don’t need them? Remove such unnecessary photos using a duplicate photo cleaner. Removing such photos gives you an organized Gallery of photos and increased free space on your device. Here we are listing the 10 Best Duplicate Photo Cleaner Apps for Android device.


1. CleanUp Master– Duplicate Photo Cleaner & Junk Cleaner


CleanUp Master is the best Duplicate Photo Cleaner for all your Android devices. It scans all the similar and duplicate (exactly same) photos and selfies present on your device.


The app supports both internal (your phone storage) and external storage (SD card). You can select the location where you want to find the duplicates. The location could be either your camera roll or a particular folder or the entire phone storage. The scanning of duplicates is super fast and the results are given in a clear format. Get rid of duplicates from your device and recover space you never knew about.

2. Remo Duplicate Photos Remover


Remo Duplicate Photos Remover scans and finds the similar photos present on your device. It uses Remo’s intelligent De-Dupe Algorithm which scans and displays duplicate or similar photos in sets. The app gives you the option to delete the duplicate photos by either selecting the entire set or a number of images from the set. It safely keeps one copy of the photo even if you delete the entire set.


Remo Duplicate Photos Remover uses two scan modes for finding the results:


Scan Similar: Photos which are similar to each other but not exactly the same are found in this mode.


Scan Exact: Photos which are exactly similar are found in this mode.

3. Duplicate Photos Remover


Duplicate Photos Remover scans your phone’s internal & external storage for duplicate & similar looking photos so you don’t have to go through hundreds of photos manually for deleting photos.


It consists of three intelligent Scan Modes for finding duplicates. You can choose any mode as per your choice. These modes are:


Camera Images: This mode scans the photos that have been captured from your phone’s camera.


Full Scan: This mode scans your entire phone for duplicates. This includes both the internal & external storage.


Select Folder: Use this mode for finding duplicates existing in a particular folder.

4. Duplicate Photos Cleaner 2017 – Gallery Organizer


Duplicate Photos Cleaner is the ultimate duplicate photo cleaner app for your Android device. It is the perfect app to find and clean duplicate or similar photos.


Duplicate Photos Cleaner consists of flexible settings with which you can delete duplicates as per your choice. It uses parameters like GPS, Matching Level and Time Interval to find the duplicates. In the default scan, all these parameters are automatically set while in the custom scan, you can adjust these parameters to get results according to your choice.


The app gives you 100% accurate results and supports your phone’s external storage (SD card) as well.

5. Gallery Doctor – Photo Cleaner


Gallery Doctor – Photo Cleaner automatically identifies unwanted photos on your device. It not only finds the duplicate photos present on your device but also the bad ones. It uses a combination of machine learning & computer vision to immediately identify the unwanted photos.


Unwanted photos like similar photos, photos with poor quality, dark photos, blur photos are easily recognized by this app. It lets you review the photos you want to keep and decide what you want to do with them. You can swipe left to delete the photos or right to keep them.

6. Duplicate Image Finder


Duplicate Image Finder finds the duplicate photos on your device. You can make the judgement yourself if you want to delete them or keep them.


Key Features:


Searches the entire phone storage to find duplicate images very quickly.


Shows the visual grid for duplicate images on the result screen.


Let you select and delete the duplicate images.


Shows the image path in the grid so you can make a better judgement to delete the images.

7. Duplicate Media Remover


The application finds duplicate images present on your internal (phone memory) and external storage (SD card). It only finds duplicates in those folders that have been selected for the scan.


Features:


All the duplicates can be marked for deletion including the original image. Verify that the selected images are the one that you definitely want to delete because they cannot be retrieved once they are deleted.


Automatic scans can be scheduled on a weekly basis, allowing one scan per day.


You can share the statistics of the last scan with your friends.


The statistics of all the scans are maintained for your reference

8. Duplicate Photo Video Remover


Duplicate Photo Video Remover identifies and removes duplicate photos present on the internal and external storage of your device. You just need to select the desired folder where you want to find the duplicate photos. When the scan is completed, duplicate photos are categorized in groups so you can easily view them and delete the ones you don’t need.


What can you do with Duplicate Photo Video Remover?


Hide certain photos which appear as duplicates after the completion of scanning.


Delete the duplicates by auto-marking them. The auto-mark feature keeps one copy of the duplicate set and deletes all others.


Save your session & search results so that app does not need to scan again. This way you can save scanning time.

9. Duplicates Remover


Duplicates Remover identifies the duplicate and similar photos present in the Gallery of your device. The resultant duplicates are shown in a group-wise format so that the selection of duplicates is easier.


Features:


You can delete all photos with the select all feature or you can remove specific photos by selecting them one by one.


All the sessions and results are saved and stored so that it will take lesser time to search next time.


You can see the path where the duplicate photos are kept and delete them from there.

10. Falcon Mobi Cleaner


Falcon Mobi Cleaner is the best Duplicate Photo Cleaner for all your Android devices. It scans all the similar and duplicate (exactly same) photos and selfies present on your device.


The app supports both internal (your phone storage) and external storage (SD card). You can select the location where you want to find the duplicates. The location could be either your camera roll or a particular folder or the entire phone storage. The scanning of duplicates is super fast and the results are given in a clear format. Get rid of duplicates of your device and recover space you never knew about.

11. Remove Duplicate Files


Remove Duplicate Files is a duplicate photo cleaner that smoothly scans and lets you delete duplicate or similar photos from your device. It works on all types of photos – photos taken in burst mode, resized photos or HDR photos. All photos are listed in groups.


Key Features:


High Speed- It is very quick as it uses a powerful algorithm that makes the search of duplicate photos extremely fast.


Compact Viewing- It shows the results in a clear group-wise format for easy viewing. Before deleting the duplicate photos, you can have a clear look at them instead of opening them individually.


Supports External Storage- It works on your device’s SD card as well.


Jihosoft Android Data Recovery is the most powerful and professional data recovery software for Android that can restore deleted or lost contacts, photos, videos, audios, SMS, call logs, WhatsApp chat, Viber messages from any Android devices due to accidental deletion, virus attack, formatting. It supports all popular Android smartphones and tablets like Samsung, HTC, LG, Huawei, Motorola, Nexus, etc. In the meantime, you will be guided step by step if you never used this kind of tool before.


Jihosoft WhatsMate is an all-in-one WhatsApp Manager which can be used as a complete solution to backup, restore, recover and transfer WhatsApp chat history, contacts, call logs, pictures, videos, audio messages and all other WhatsApp attachments on Android&iPhone.


Must Check Out Posts:
View RAW Images and Thumbnails on Windows 10
How to Hide Secret Apps on Android Phone
Fix WhatsApp Media Files Doesn’t Exist on SD Card
Fix SD Card Not Detected on AndroidRecover WhatsApp Messages from Android
How to Enable USB Debugging on your Android Device

Any app suggestions or topic recommendations are appreciated in the comments down below.
Apple is Back with iOS 12 Beta 8

Two days after releasing and again pulling back the beta 7, Apple is back with its new iOS 12 Beta 8.


The previous beta 7 had so many bugs that resulted in a sluggish device performance. Also, the group FaceTime call has been removed for now until the final release, there is a new welcome screen in Messages app and the Measure app icon has been modified.


Same is the case with Beta 8 besides fixing the performance issues that were faced in Beta 7.


If you are not a developer and want to install iOS 12 Public Beta then here is how to install iOS 12 on iPhone & iPad.


Jihosoft Giveaway Alert:
iPhone Backup Extractor - Extract Data from iPhone Backup
The best iPhone Backup Extractor software to extract photos, text messages, contacts, voice memos, note, WhatsApp, Viber and etc from iPhone/iPad backup.
Must Read:Jihosoft iTunes Backup Unlocker
Jihosoft Android Data Recovery: the best Android Data Recovery software for Windows and Mac to recover deleted contacts, messages, photos, videos, WhatsApp and etc from Android devices.If you can’t sync with iTunes and want to rescue data from a disable iPhone, you could try Gihosoft iPhone Data Recovery. Also feel free to ask questions on the iDevice is disabled error in the comments section below.

Wednesday 15 August 2018

How to Uninstall iOS 12 Beta

How to Uninstall iOS 12 Beta

If you are going to uninstall iOS 12-beta version from your iPhone, iPad or iPod touch, then you can follow these steps to do it seamlessly:

Step 1. Get your iPhone, iPad or iPod touch ready for uninstalling iOS 12 by putting your device in recovery mode. How to enter recovery mode would depend on the iOS device you’re using:


iPhone X, 8 or 8 Plus: Quickly press and release the Volume Up button, press and release the Volume Down button, press and hold the Side button. You’ll see the “Slide to power off” screen, wait until the “connect to iTunes’ screen appears.


iPhone 7 or 7 Plus: Press and hold the Volume Down and the Side buttons at the same time. You will see an Apple logo while holding these buttons; release the buttons when you see “Connect to iTunes” screen.


iPhone 6s or earlier versions, and all iPads: Press and hold the sleep/wake button and home buttons simultaneously. You will see an Apple logo while holding these buttons; release the buttons when you see “Connect to iTunes” screen.

Step 2. Connect your iPhone to iTunes using a lightning cable. Make sure that the system you are using is the one having your original iTunes backup. iTunes will notify you that it just discovered an iPhone/iPad/iPod in Recovery Mode.


Step 3. Click “Restore” tab and wait for the restore process to complete. In the end, your device will reboot into setup mode, and you can now restore your archived backup.Jihosoft Giveaway Alert:

iPhone Backup Extractor - Extract Data from iPhone Backup

The best iPhone Backup Extractor software to extract photos, text messages, contacts, voice memos, note, WhatsApp, Viber and etc from iPhone/iPad backup.

Must Read:Jihosoft iTunes Backup Unlocker

Jihosoft Android Data Recovery: the best Android Data Recovery software for Windows and Mac to recover deleted contacts, messages, photos, videos, WhatsApp and etc from Android devices.

Sunday 12 August 2018

This App Can’t Be Moved To Trash Because it’s Open or in Use on Mac OS


This App Can’t Be Moved To Trash Because it’s Open or in Use on Mac OS

Are you trying to remove unwanted Apps are installed on your Mac, But Mac System show or giving a message like “app can’t be moved to trash because it’s open or in Use”, “After force quite app running the app on screen still not deleting”. Here I found the exact solution for all the Mac users who are running MacOS Mojave, High Sierra. I also discussed why this happens for the selected apps that cannot delete from Launchpad or under the application folder.

Also message clearly shown the app is running, open or in use. So, first, we need to find where is the app open and how to identify. In the reply, activity monitor will help to find running the app in the background, then force close from activity monitor.
Related Reading:

How to Free Up Space for iPhone

How to Create Apple ID without Credit Card if No None Option

4 Tips to Fix Unable to Install iOS 12 Update

our readers mail us and ask the solution for queries like they can’t empty trash Mac because don’t have permission, file in use or facing error 8003 or some guys getting error code 50, or time machine, can’t empty trash on Mac external hard drive. We advise all of them to follow given solutions.You may also like:
how to recover deleted photos from samsung galaxy s5
how to recover data after factory reset android free
Solved Can’t Empty Trash Mac: MacBook Pro/ MBA/ iMac


To check running the app on activity monitor, Open spotlight search > type “Activity Monitor” > Search app name from search box under the Memory tab.

Here, I want to delete the Google Drive app. Select all the process threads of Google Drive one by one and Click on “X” mark in activity monitor.


Next, Activity monitor will ask for “Force Quit” process, Go with it and done by completely stop all the process behind the particular app.


After closing down all types of process thread from the system we can go for uninstalling application in alternate ways.
Move trash or uninstall the app from the Application folder

Under the Application, folder finds the app that you want to move into the Trash/Remove or uninstall.


Note: you can’t remove or uninstall the app that has been preinstalled on a system with MacOS. Make sure and try to remove only third-party app or app store app.

Above steps, we should try in the case simple method to force quite or uninstall app not work or close frozen windows on Mac.

If you accidentally lost iPhone texts, you can also use Gihosoft iPhone Data Recovery to get back deleted messages from iPhone on Mac.

Top 5 Websites to Download Free Funny Ringtones for iPhone 2018

Top 5 Websites to Download Free Funny Ringtones for iPhone

If you would like to have funny ringtones for iPhone free download instead of making funny ringtones of your own, you can visit any one of top 5 websites introduced below. Check them out.
#1. Zedge

Zedge is arguably the most popular website for iPhone ringtones. It has some of the best funny ringtone collections – and they are all free.


Pros:


It offers totally free funny ringtone download for your iPhone.


Funny ringtones can be downloaded directly to your iPhone once you have the Zedge mobile app for ringtones. You can still download the funny ringtones to your computer and transfer them to your iPhone.

Cons:


Persistent pop-ups and animated ads can prove to be really time-consuming.
#2. Mobile 9

This is another top website for downloading funny ringtones to your iPhone for free. You will find a large community of users and you can still download other items such as wallpapers, screensavers, games, and more for free.


Pros:


All downloads are totally free.

Cons:


Users must create an account to download free funny ringtones.


Not very friendly to newbies, although experience over time will give you access to unlimited funny iPhone ringtones.
#3. Free Ringtones

Free Ringtone allows you to download lots of funny ringtones for free on your iPhone. The website is easy to navigate for newbies with a search tool that allows users to search for the sound of their choice. You can search by categories, artist name, or by the most downloaded funny ringtones.


Pros:


No account creation needed to access free funny ringtones for your iPhone.


No subscription or download fee required.

Cons:


Funny ringtones must first be downloaded to your computer before they are imported to your iPhone.
#4. Myxer

This is another top website for downloading free funny ringtones for your iPhone. You will find a massive collection of funny ringtones and other interesting materials for download.


Pros:


No hidden charges or subscription fee required.


There is online search tool that allows you to select your favorite funny ringtone based on the name of the song or the genre.

Cons:


Funny ringtones must first be downloaded to your computer before they are imported to your iPhone.
#5. iPhone Ringtones

This website offers tons of iPhone ringtones for you to select from. You can find the latest funny ringtones to download for free.


Pros:


Download is totally free.

Cons:


Lots of annoying ads on the website make the interface a tad difficult to handle.

You are not alone if you are already tired of hearing the same ringtone on every iPhone around. Many people only go with default iPhone ringtones because they feel getting a unique tone may be a daunting task. Now you can enjoy unique funny ringtones on your iPhone – yes, you can now stand out from the crowd while expecting your next notification.
You may also like:
If you lost videos from iOS Camerall Roll which are nowhere to download again, you can use Gihosoft iPhone Data Recovery to get back deleted videos from iOS device including iPhone, iPad and iPod Touch.
Gihosoft Free Android Data Recovery can help you easily recover lost data such as photos, videos, contacts, text messages, WhatsApp & Viber chats from Google Pixel/XL or other Android phones effortlessly.
Jihosoft Android Data Recovery: the best Android Data Recovery software for Windows and Mac to recover deleted contacts, messages, photos, videos, WhatsApp and etc from Android devices.
Any app suggestions or topic recommendations are appreciated in the comments down below.

Friday 3 August 2018

How to Set Screen Time for Parental Control


How to Set Screen Time for Parental Control

Parents can use this app to put screen time parental control on their children’s iPhone or iPad to help in managing their phone usage.
1. Enable Screen Time from Settings

To be able to use all the Screen Time features on your iPhone or iPad, you need to first enable Screen Time on your phone. You will then need to set up the different sub-features individually according to your requirements. Most of the time you will find Screen Time enabled as a default in iOS 12, but if it is not follow these steps to enable it:

Step 1: On your iPhone go to Settings and click on the Screen Time feature.

Step 2: Click on the Turn on Screen Time feature.

Step 3: Two options will be displayed that you need to choose from. Choose the feature as a parent or a normal user.

Step 4: Then click on Continue.


You need to set a Screen Time passcode if you do not want other people using your Screen Time and making changes to your Screen Time settings. This is how you set a Screen Time passcode.

Step 1: Click on Screen Time passcode.

Step 2: Then enter a new passcode and click Confirm. You have now set up your Screen Time.
2. Set App Limits

Screen Time allows you to set screen time parental control on particular apps that you use every day to prevent you from overusing them. If you feel you need to set limits on a particular category of apps, you can use App limits to do it. These are the steps you need to follow to set this up:

Step 1: On your iPhone open Screen Time, click on App limits, and enter your passcode.

Step 2: Click on the Add limit tab.

Step 3: Choose the app categories that you want to set limits on like entertainment, social networking, games etc. then click Add.

Step 4: Set the time limit for the app categories you selected. Note that you will get a ‘Time limit reached’ alert notice every day at midnight notifying you of the App limits reset. You can ignore it by clicking Ignore limit tab.


3. Downtime

Downtime is a scheduling app that helps you to choose only the apps you require and phone calls that you can use on your device at a particular time. This is how you set it up:

Step 1: On your iPhone Settings go to Screen Time.

Step 2: Scroll down to Downtime and enter your Screen Time passcode and Turn on downtime switch.

Step 3: Click Start to set the time then click End to set the time limit.

Step 4: Your Home screen will then get dimmer and only the approved apps will appear when downtime is working. A ‘Time limit reached’ alert message will appear if you try to open any other app apart from the approved ones.

Step 5: To ignore it click on ‘Ignore limit’ then enter your Screen Time passcode. Click on the Green plus button to add allowed apps and the Red button to delete apps then select Always and enter your passcode.

Step 6: Your Home screen will brighten as normal meaning you have finished setting up your downtime.


4. Monitoring App Usage

You will receive a detailed weekly report of how you have used your iPhone or iPad in the last seven days. A popup summary will show you how you have used your device on a daily basis comparing it to the previous week if it has gone up or down. You also receive the average number of daily notifications you received. Screen Time uses bar chart color-coded to show you your daily app usage on the most used apps and an Insight section on useful observations.

From the summary report you get to see the length of your longest session, the daily usage graph, after bed device usage time which can be a problem. You also get information on the apps that are sending the most notifications and causing the most pickups.

With this information you are in a better position of knowing how you are using every app on your device and if it is necessary to put screen time parental control in iOS 12 on specific apps.


5. Setup Content & Privacy Restriction

Screen Time is a great app that you can use to customize and block unwanted content from your device. To set these restrictions you need to follow these steps:

Step 1: On your iPhone go to Settings and open Screen Time.

Step 2: Select the Content & privacy restrictions tab and enter your Screen Time passcode.

Step 3: Turn on the Content & privacy switch.

Step 4: Once you are done you can now put screen time parental control iOS 12 on almost everything like on iTunes purchases, app purchases, apps volume limit, apps explicit language, do not disturb etc.


Smartphones are becoming too addictive to the point of concerned parents wanting to monitor and put screen time parental control on their children’s devices. With the different features available, you can now effectively put screen time parental control iOS 12 to manage your iPhone or iPad usage in a healthier way.

Jihosoft Giveaway Alert:Image result for Jihosoft iPhone Backup

Comment and win free lifetime registration code of Jihosoft iPhone Backup Extractor - Extract Data from iPhone Backup
https://www.jihosoft.com/itunes/itunes-backup-extractor-free.html
The best iPhone Backup Extractor software to extract photos, text messages, contacts, voice memos, note, WhatsApp, Viber and etc from iPhone/iPad backup.


Monday 23 July 2018

How to Disable Instagram Activity Status on iPhone and Android

How to Disable Instagram Activity Status on iPhone and Android


A green dot appears under the profile picture when a user is online. You can view the green status indicator point in your inbox and your friends list. The application allows you to see the status of the people you follow and those with whom you spoke using the Direct.


How to turn off the status indicator Instagram online iPhone and Android


Step # 1. Open Instagram on your device.


Step # 2. Now press the profile tab in the bottom right corner of the screen.


Step # 3. Next, on your iOS device, you must press the gear icon.


On your Android device, you need to tap the three vertical dots at the top right corner of the screen.


Step # 4. Then press Activity Status .


Step # 5. Finally, Disable the switch next to Show Activity Status


That's About It!

Go ahead, no one can see when you go online. In addition, you will not be able to see the status of other activities either.


What is your opinion?


If you lost videos from iOS Camerall Roll which are nowhere to download again, you can use Gihosoft iPhone Data Recovery to get back deleted videos from iOS device including iPhone, iPad and iPod Touch.


Jihosoft iPhone Backup Extractor Extract and recover all types of data from iPhone backup files, such as camera roll photos, videos, SMS, contacts, reminders, WhatsApp, and etc.


Gihosoft Android data recovery Free is a super awesome software specialized in Android file recovery. With this program, you are able to recover deleted photos, music, videos, messages, contacts, call logs, WhatsApp messages, Viber chat history and more from Samsung, Huawei, LG, HTC, Motorola, Google, Oneplus, Sony, Lenovo, ZTE and other Android devices directly. Meanwhile, this Android data recovery software is available for both Windows and Mac platforms.

iPadOS Download Available Now for iPad, iPad Pro and iPad Air (IPSW Links)

Apple has released iPadOS for iPad, iPad Pro, and iPad Air. Here’s how to download iPadOS and install it on your iPad to enjoy the hundreds ...